おっしゃ。CircleCIのAPI経由でデプロイできた。
あとはSlackでリリースできるようになったら神— adachin👾SRE (@adachin0817) August 27, 2020
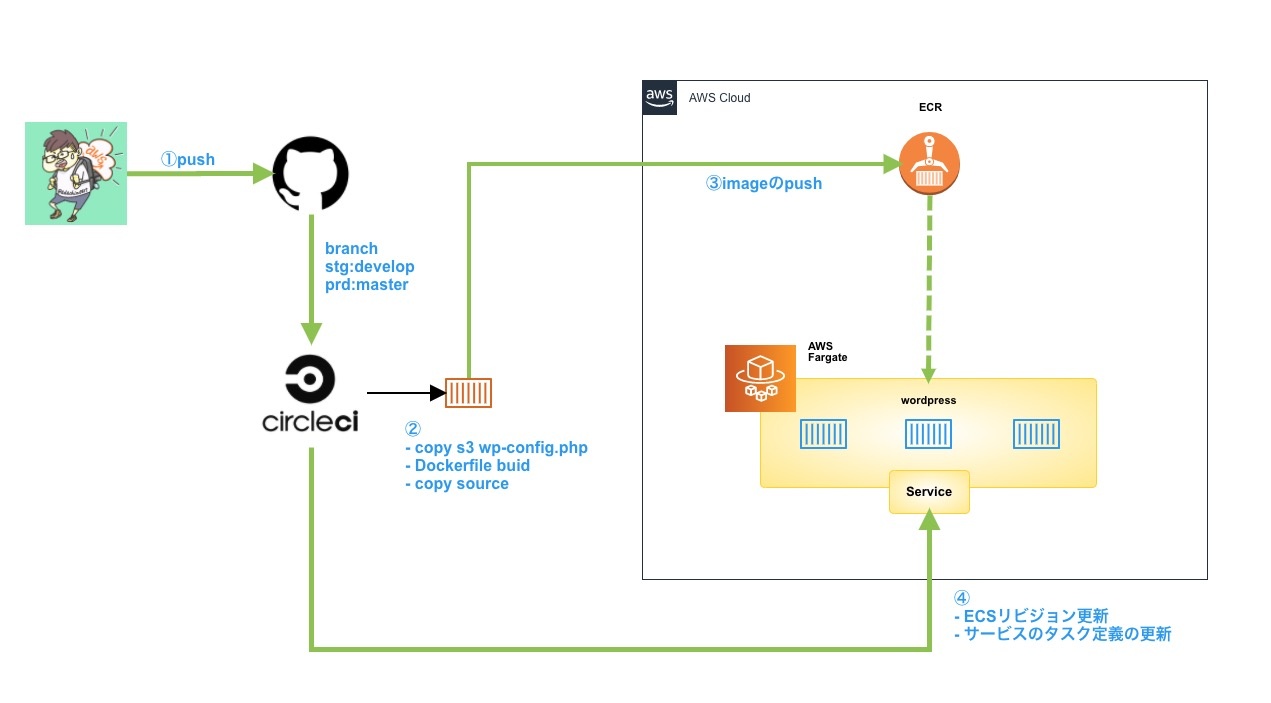
以下のように、今までCircleCIでECS/Fargateでのステージングデプロイはfilters branchesでdevelopブランチに対してマージを出していました。それに本番反映するためにdevelopブランチをmasterブランチに対してプルリクマージを出すというgit flowで運用していました。(なかなかの手間が…)
※今回はWordPress
|
1 2 3 4 5 6 7 8 9 10 11 12 13 14 |
workflows: version: 2 deploy_stg: jobs: - deploy_wordpress_stg: filters: branches: only: develop deploy_prd: jobs: - deploy_wordpress_prd: filters: branches: only: master |
これにより、気楽にステージング環境にデプロイすることができず、開発スピードも遅くなり、逆にしくじって元に戻すのが大変ということもあるので、今回はgithub flowでAPI経由でデプロイを試してみました。
■API Reference
https://circleci.com/docs/ja/2.0/api-intro/
https://circleci.com/docs/api/v2/#circleci-api
|
1 2 3 4 5 6 |
curl -u ${CIRCLECI_TOKEN}: -X POST --header "Content-Type: application/json" -d '{ "parameters": { "myparam": "./myspecialdir", "myspecialversion": "4.8.2" } }' https://circleci.com/api/v2/project/{project_slug}/pipeline |
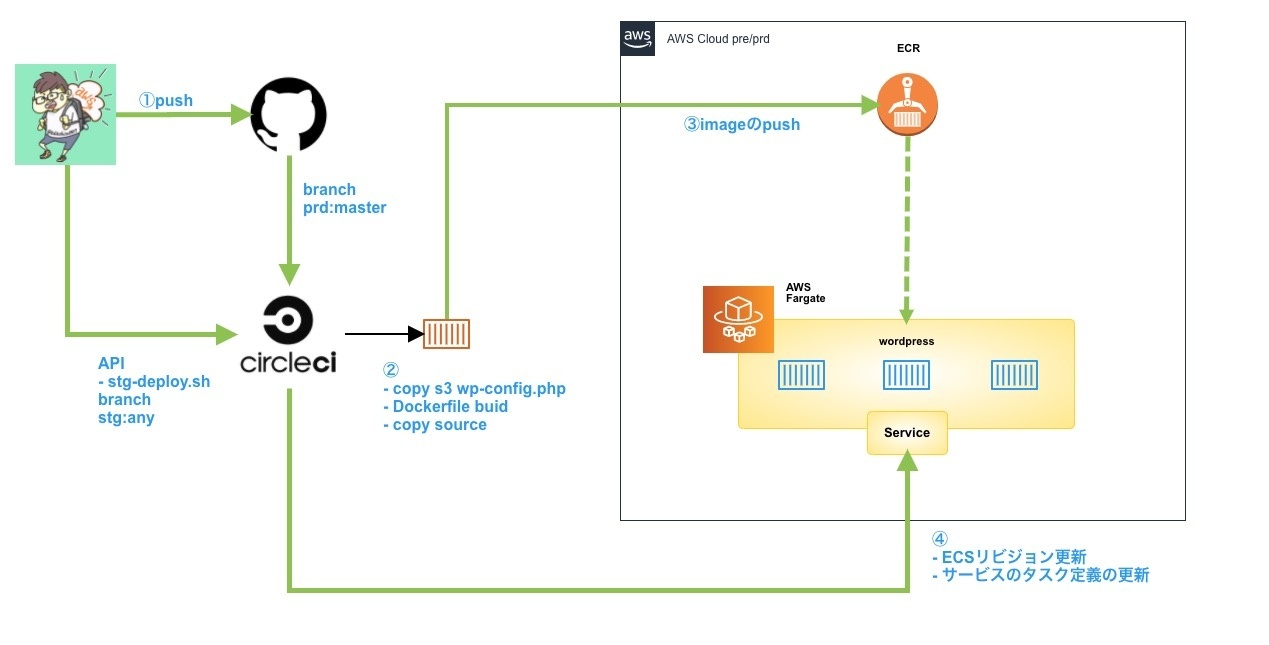
ローカルからcurlでAPIを指定すればジョブに対してデプロイができます。もちろんオプションでブランチ名を指定することも可能。以下デプロイフローが変わります。
- API経由でのデプロイ構成図
masterマージはそのまま本番反映したいのでそのままで良き。ステージングはfilters branchesの指定がなくなります。これによってpushしたブランチ名を指定してサクッとステージング環境へデプロイが可能になるわけですね(シェルスクリプト)。実際コードを見てみましょう。
■CircleCI
https://circleci.com/docs/ja/2.0/pipeline-parameters/
- Make Personal API Tokens
まずはCircleCIのダッシュボードから左下のプロフィール画面をクリックすると以下のようにPersonal API Tokensがあるので発行しましょう。
- config.yml
|
1 2 3 4 5 6 7 8 9 10 11 12 13 14 15 16 17 18 19 20 21 22 23 24 25 26 27 28 29 30 31 32 33 34 35 36 37 38 39 40 41 42 43 44 45 46 47 48 49 50 51 52 53 54 55 56 57 58 59 |
version: 2.1 orbs: aws-ecr: circleci/aws-ecr@6.7.0 aws-ecs: circleci/aws-ecs@1.1.0 parameters: deploy_wordpress_stg: type: boolean default: false executors: docker_build: machine: docker_layer_caching: true jobs: deploy_wordpress_stg: working_directory: ~/app executor: docker_build steps: - checkout - run: name: setting aws configure command: | aws configure set aws_access_key_id ${AWS_ACCESS_KEY_ID_STG} \ && aws configure set aws_secret_access_key ${AWS_SECRET_ACCESS_KEY_STG} - run: name: copy wp-config.php command: | aws s3 cp s3://stg.adachin.jp/wordpress/wp-config.php ./wp-config.php.corp - aws-ecr/build-and-push-image: account-url: AWS_ECR_ACCOUNT_URL_STG aws-access-key-id: AWS_ACCESS_KEY_ID_STG aws-secret-access-key: AWS_SECRET_ACCESS_KEY_STG region: AWS_REGION repo: 'wordpress' dockerfile: docker/stg/wordpress/Dockerfile tag: "${CIRCLE_SHA1}" - aws-ecs/update-service: family: 'wordpress' service-name: 'wordpress-service' cluster-name: 'adachin' container-image-name-updates: 'container=wordpress,image-and-tag=${AWS_ECR_ACCOUNT_URL_STG}/wordpress:${CIRCLE_SHA1}' deploy_wordpress_prd: ~省略~ workflows: version: 2 deploy_stg: when: << pipeline.parameters.deploy_wordpress_stg >> jobs: - deploy_wordpress_stg deploy_prd: jobs: - deploy_wordpress_prd: filters: branches: only: master |
6行目に新しく parameters を追加しましたが、特定のパラメーターの値でパイプラインをトリガーすることができます。なのでWorkflowを任意で実行するためのフラグとして、今回はdeploy_wordpress_stgと名付けました。
51行目からfilters branchesを削除して、 pipeline.parameters という変数を指定することで、curlで指定したtrueが代入されます。これによってステージングへのデプロイは特定のブランチに対していくらpushしても、デプロイされないようにwhenで条件分岐をしています。
- stg-deploy.sh
|
1 2 3 4 5 6 7 8 9 10 11 12 13 14 15 16 17 18 19 20 21 22 23 24 25 26 27 28 29 30 31 32 33 34 35 36 37 38 39 40 41 42 43 44 45 46 47 48 |
#!/bin/bash BRANCHNAME=$1 url="https://hooks.slack.com/services/xxxxxxxxxxxxx" username='Stg-deploy' to="stg_deploy" subject='Stgデプロイを開始しました:docker2:' color="#0000FF" message="ブランチ名: `"${BRANCHNAME}"` https://app.circleci.com/pipelines/github/プロジェクト名/リポジトリ名" help() { echo " 下記のようにブランチを指定して実行してください。 (例) sh stg-deploy.sh ブランチ名 " } if [ $# -ne 1 ];then help exit fi curl -u 上記のAPIを指定: -X POST --header "Content-Type: application/json" -d '{ "branch": "'"${BRANCHNAME}"'", "parameters": { "deploy_wordpress_pre": true } }' https://circleci.com/api/v2/project/github/プロジェクト名/リポジトリ名/pipeline echo " ブランチ名/ "${BRANCHNAME}" のStgデプロイを開始しました。 #stg_deployにて確認しましょう。 " payload="payload={ \"channel\": \"${to}\", \"username\": \"${username}\", \"text\": \"${subject}\", \"attachments\": [ { \"color\" : \"${color}\", \"text\" : \"${message}\", } ] }" curl -m 5 --data-urlencode "${payload}" ${url} |
stg-deploy.shはブランチ名である引数を指定して発動するように作ってみました。
■やってみる
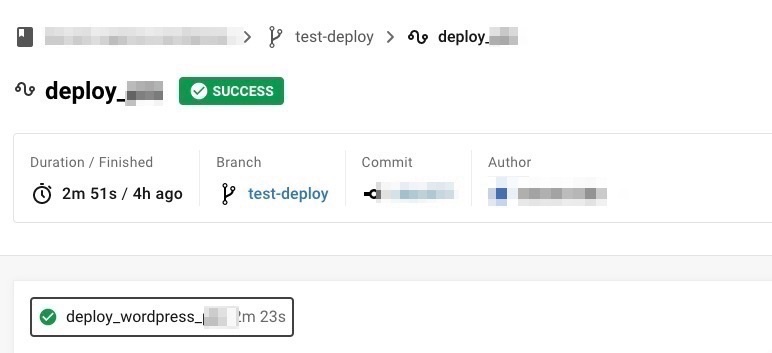
今回はtest-deployというブランチ名を引数指定して叩いてみましたが!見事にデプロイされました!masterマージもちゃんと本番反映されていたのでOK。
|
1 2 3 4 5 6 7 8 9 10 11 12 13 14 |
$ sh stg-deploy.sh 下記のようにブランチを指定して実行してください。 (例) sh stg-deploy.sh ブランチ名 $ sh stg-deploy.sh test-deploy { "number" : 74, "state" : "pending", "id" : "xxxxxx-xxxxx-xxxxx-xxx-xxxxxxxx", "created_at" : "2020-08-27T06:14:43.973Z" } ブランチ名/ test-deploy のStgデプロイを開始しました! #stg_deployで確認しましょう。 |
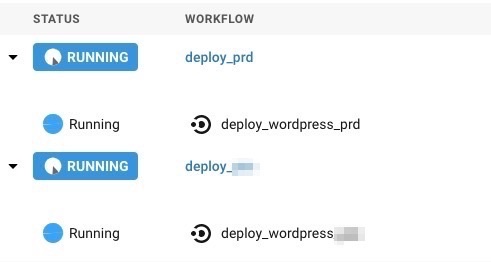
ブランチ名をmasterにすると本番とステージングがmasterブランチでデプロイされます。
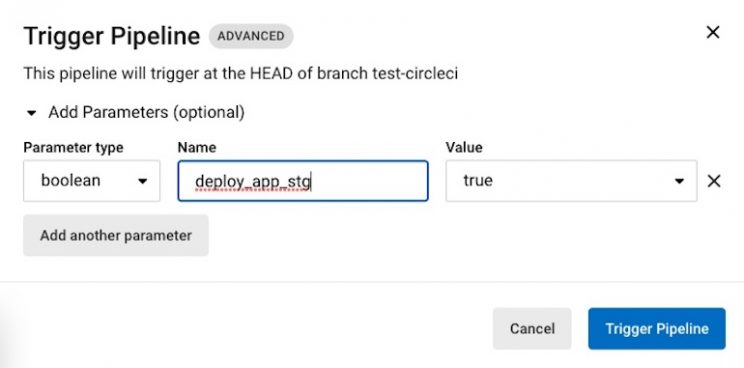
ちなみにWebからTrigger Pipelineを使ってパラメーターを追加すればデプロイできます。
■まとめ
素晴らしい!これで気楽にステージ環境へデプロイすることができました。意外と簡単だった。curlで結構ハマったけど。というわけで、次はSlackのワークフローで実行できるように実装してみよう!!これは作り込みだな。
- 追記
Ciがあった場合CIの部分もデプロイ時に実行されてしまうので、以下のように予め以下シェル内でfalseを定義するといいですね。
- stg-deploy.sh
|
1 2 3 4 5 6 7 |
curl -u 上記のAPIを指定: -X POST --header "Content-Type: application/json" -d '{ "branch": "'"${BRANCHNAME}"'", "parameters": { "deploy_wordpress_pre": true, "ci": false } }' https://circleci.com/api/v2/project/github/プロジェクト名/リポジトリ名/pipeline |
- config.yml
|
1 2 3 4 5 6 7 8 9 |
parameters: ci: type: boolean default: true workflows: version: 2 ci: when: << pipeline.parameters.ci >> |



0件のコメント